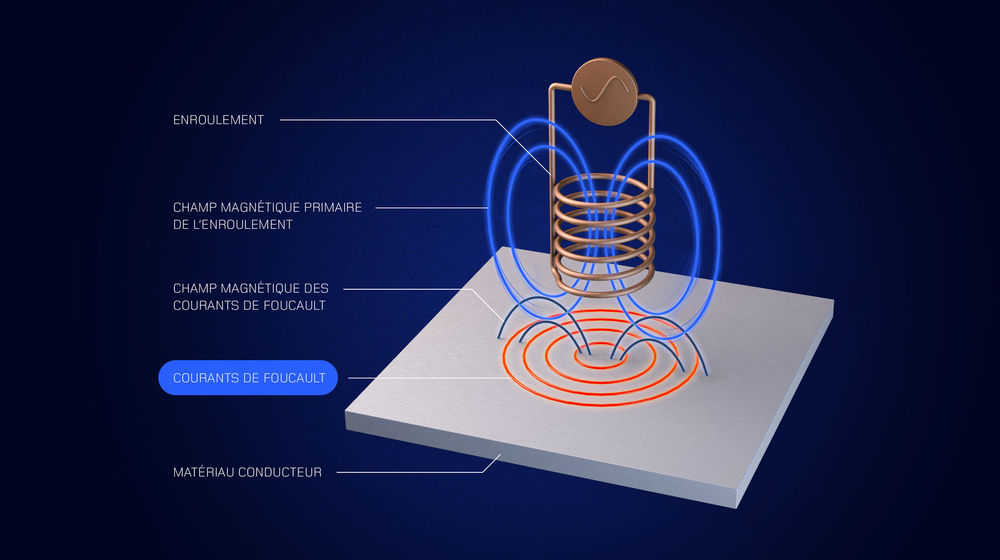
Non-destructive eddy current testing (ECT) can be applied to metal components, to check that the constituent material is sound without affecting its structure. This technique is used to inspect the quality of components leaving the production line or already in service. The ECT method is able to detect discontinuities in a component's material, such as fatigue cracking, casting defects, quench cracking, rolling defects, and variations in conductivity or magnetic permeability.
The technique harnesses a phenomenon known as electromagnetic induction, in which a magnetic field is generated by passing a current of variable intensity through a coil. On contact with a metal component, this field induces swirling "eddy" currents in the component. In accordance with Lentz's law, these eddy currents in turn emit a secondary magnetic field, opposing the field that initially created them. Any irregularities within the material (such as defects or fluctuations in electrical conductivity or magnetic permeability) disrupt the eddy currents' flow, influencing the secondary magnetic field and in turn altering the primary field inside the coil. A measuring instrument specially designed for ECT inspections detects variations in impedance, indicative of irregularities within the material. Eddy current testing is used across a broad spectrum of applications, which can be organised into the following categories: In-tube inspections using an internal probe; tube or bar inspections using a circling probe; surface probes; drilled hole probes; and special-purpose probes.
Our EC probes are designed for inspecting tubes in even the harshest environments. The coils in our probes can be protected with resin, or with plastic or metal rings, to extend the probe's service life. Probes can be either detachable or mounted on a sheath. We supply both rigid and flexible probes, depending on the geometry of the tube to be inspected. We optimise the operating frequency of our coils according to the inspected material and the characteristics of the defects being sought. For materials with a minor ferromagnetic constituent, we can supply probes with permanent magnets or a built-in saturating coil. The filling coefficient is calculated according to the customers' requirements, in order to supply a probe with the ideal specifications for the tube to be inspected.
These probes feature a quick-connector, a lightweight plastic body and a reinforced measurement head operating in differential mode. Our probes attach quickly and easily to our driver gun, with extensions available in various lengths to suit your application.
Our SRD probes are equipped with FISCHER 4-pin quick connectors, and operate using the differential reflection principle. Rigid and flexible versions are available, with a stainless steel or PEEK plastic measuring head. Expanding, variable and spherical measuring heads can also be supplied, to suit the customer's requirements.
These probes move through tubes in a spiral motion, facilitating the detection and sizing of longitudinal or circumferential defects.
These probes are designed for inspecting formed tubes. The centring cones are made with high-tech plastics designed for optimal friction and wear resistance coefficients.
These probes are designed for inspecting straight tubes. This type of probe may feature a PEEK plastic/stainless steel protective ring or front and rear guides, to extend its service life. They can be fitted with centring cones for improved centring in the tube. These probes are available with a sheath or a clip-connector.